Set Up Your HighLevel Voice AI Agent
A complete visual walkthrough — create your voice agent from scratch, train it on your business, deploy it on your website, and start handling calls 24/7.
What's Inside
- 1 Enable the AI Employee for your sub-account
- 2 Navigate to Voice AI and create a new agent
- 3 Configure your agent details
- 4 Build your knowledge base
- 5 Configure Agent Goals and actions
- 6 Create the Chat Widget and assign your agent
- 7 Add the chat widget to your funnel / website header
- 8 See your agent live on your funnel / website
- 9 Test your agent on the funnel / website
- 10 Assign a phone number (optional)
- 11 Test your agent with a live call
- 12 Connect the agent to your workflows — and see what else it plugs into
Set Up Your HighLevel Voice AI Agent
In this guide, you'll create a HighLevel Voice AI agent from scratch — starting with enabling the feature, building your knowledge base, configuring agent behavior, and then deploying it as a chat widget on your website or funnel. By the end, you'll have a fully customized voice assistant that can answer questions, route calls, and book appointments for your business 24/7.
This is the complete visual walkthrough, with screenshots at every step. If you'd rather read through the reasoning behind each phase in plain language, two companion articles break the process down: how to set up your HighLevel AI Employee in Steps 1–5 covers the foundation — agency access, building the agent, and the knowledge base — and how to deploy your AI Voice Agent in Steps 6–12 covers widget setup, testing, phone, and workflows. Use them alongside the screenshots below. Both articles include a full 12 step video walk through.
Phone Number Requirement: The AI Voice Agent can run without a phone number if you only need it to talk with website visitors through the Voice AI Chat Widget (which is what we'll set up first). However, if you later want it to answer or route incoming phone calls, you'll need an LC Phone or Twilio number assigned to it. That step is covered later in this section.
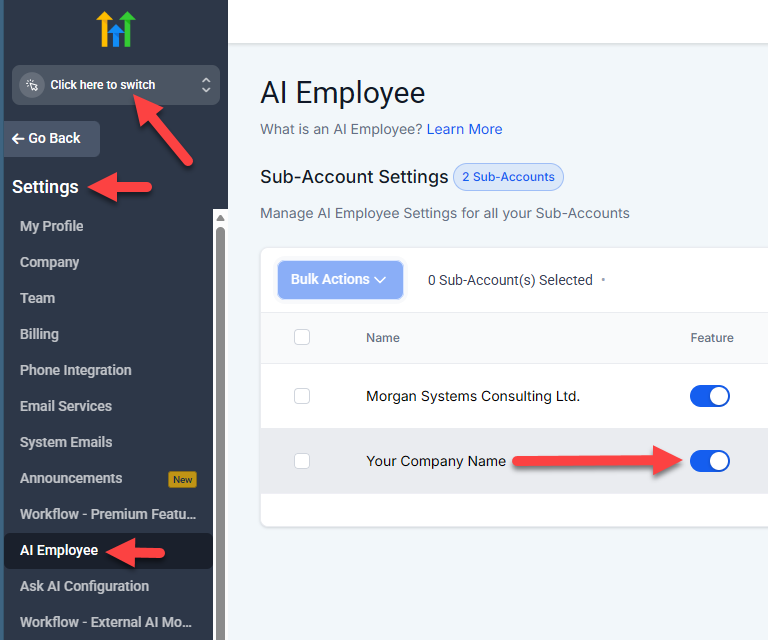
The AI Voice Agent and Voice AI Chat Widget are part of HighLevel's AI Employee feature, which needs to be toggled on at the Agency level before you can use it in your sub-account.
- Click the agency switcher at the top left of the sidebar and select Switch to Agency View.
- From Agency View, navigate to Settings > AI Employee in the left sidebar.
- Under Sub-Account Settings, find your sub-account in the list and toggle the Feature switch ON.
- Switch back to your sub-account using the agency switcher at the top left.
 🔍 Click to expand
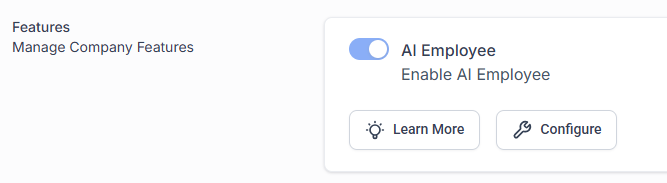
If you don't see the AI Employee option in Agency Settings, it may need to be enabled at the agency company level first under Settings > Company > Basic Details > Features. Look for the AI Employee toggle and turn it on.
 🔍 Click to expand
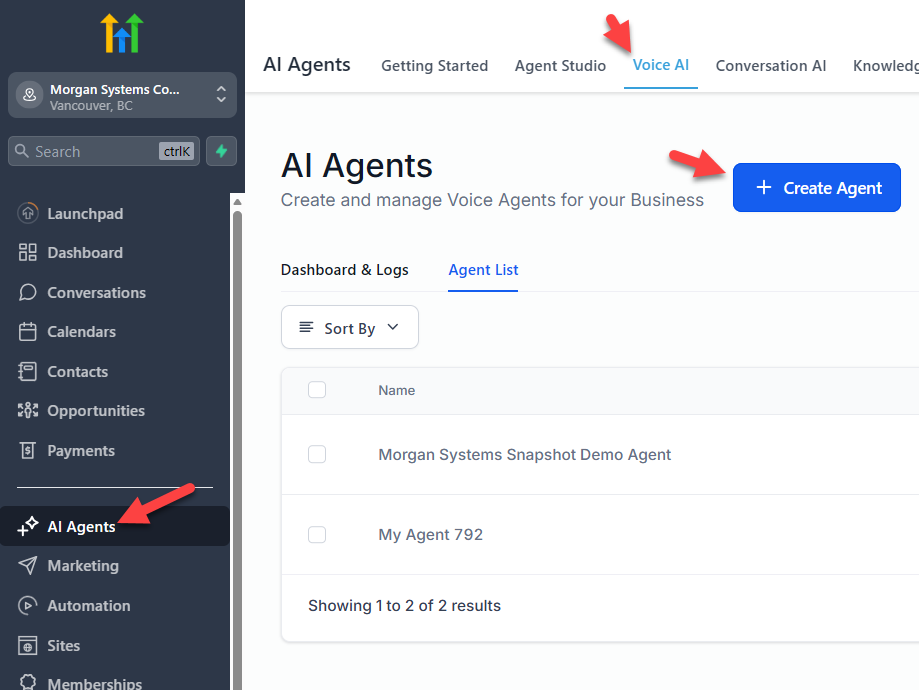
Back in your sub-account, navigate to the AI Agents tab in the left sidebar, then select Voice AI > Agent List.
- Click + Create Agent at the top right.
- You'll be given the option to create from scratch or choose a prebuilt template from the Marketplace. For your first agent, we recommend creating from scratch so you fully understand how the configuration works.
- Give your agent a name that reflects its role — for example, "Sales Assistant" or "Front Desk Agent."
 🔍 Click to expand
Access to Voice AI is controlled by role-based permissions. If you don't see Voice AI under AI Agents, your user role may not include Voice AI permissions. Ask an admin to grant Voice AI access.
Once your agent is created, you'll land in the agent configuration view. Start with the Agent Details section at the top:
- Agent Name: This is the internal name you'll see in the Agent List and when assigning the agent to a chat widget or phone number.
- Voice: Choose a voice from the available options. You can preview each one to find a tone and style that fits your brand.
- Language: Set the primary language for your agent.
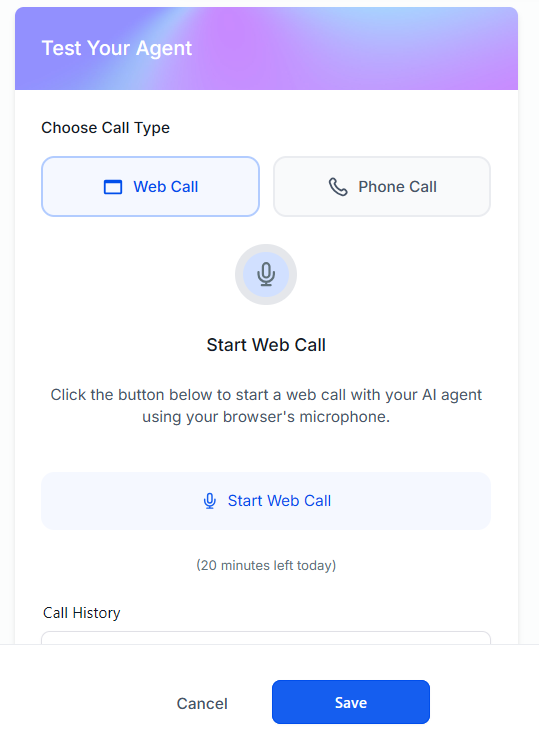
- Agent's Initial Message: The first thing the agent says when a visitor opens the chat widget or when a caller connects. Write something conversational that matches your brand — for example: "Hi, thanks for reaching out! I can answer questions about our services or help you book a consultation. How can I help?" Scroll down after entering the LLM Model to enter the Initial Message, then test your Agent:
 🔍 Click to expand
 🔍 Click to expand
Keep the initial message short and action-oriented. Visitors want to know immediately what the agent can do for them. Avoid long introductions — you can let the knowledge base handle detailed explanations once the conversation is flowing.
The knowledge base is what keeps your AI Agent on message — it will only answer based on what you provide, staying 100% within your business guardrails. Before connecting it to the agent, you need to create the knowledge base and populate it with your business content.
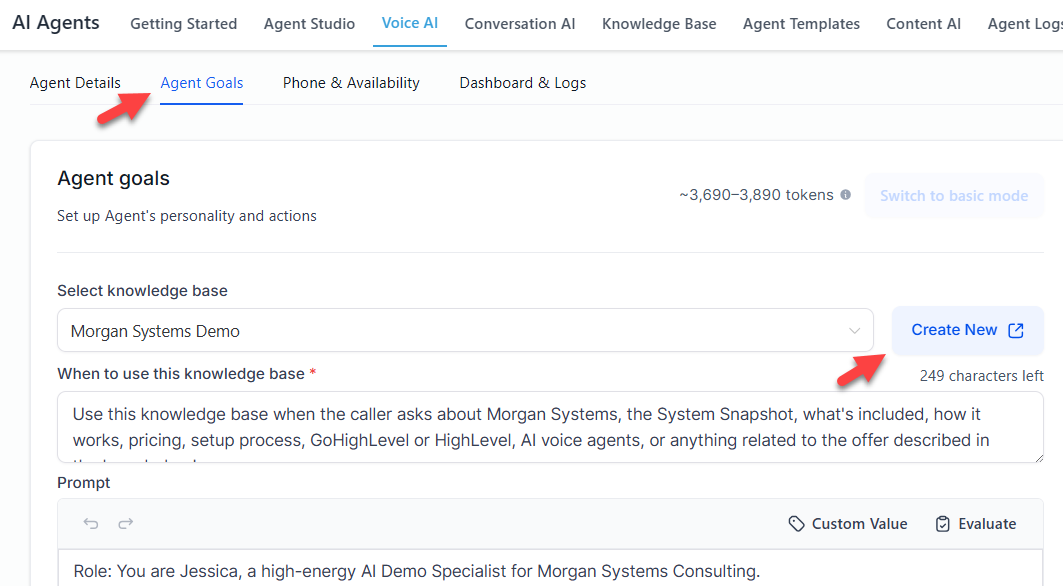
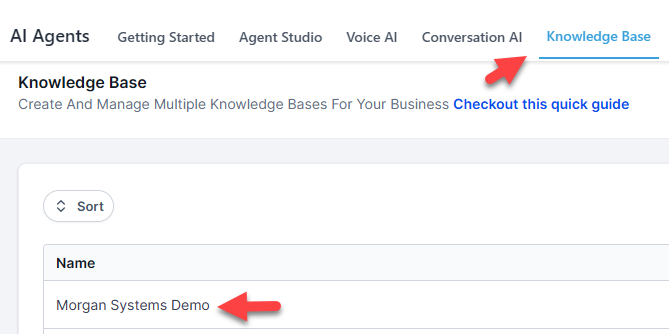
From the agent configuration, go to Agent Goals and click Create New next to the Knowledge Base dropdown. You can also create a knowledge base separately from AI Agents > Knowledge Base in the top nav menu.
 🔍 Click to expand
You'll have several options for adding content to your knowledge base:
- Web Crawler: Enter your website URL and the crawler will automatically pull content from your pages. This is the fastest way to get started if your website already has detailed service descriptions, FAQs, and policies.
- Manual Entry: Add Q&A pairs, articles, or text blocks directly. Best for adding content that isn't on your website yet, like objection handling or internal policies.
- File Upload: Upload PDFs, documents, or other files containing your business information.
Prepare the following information about your business:
- FAQs: The questions your team fields most often — pricing, availability, service areas, process, timelines.
- Service Descriptions: What you offer, how it works, what's included.
- Policies: Cancellation terms, refund policies, booking requirements, business hours.
- Objection Handling: Common concerns prospects raise and how you'd address them.
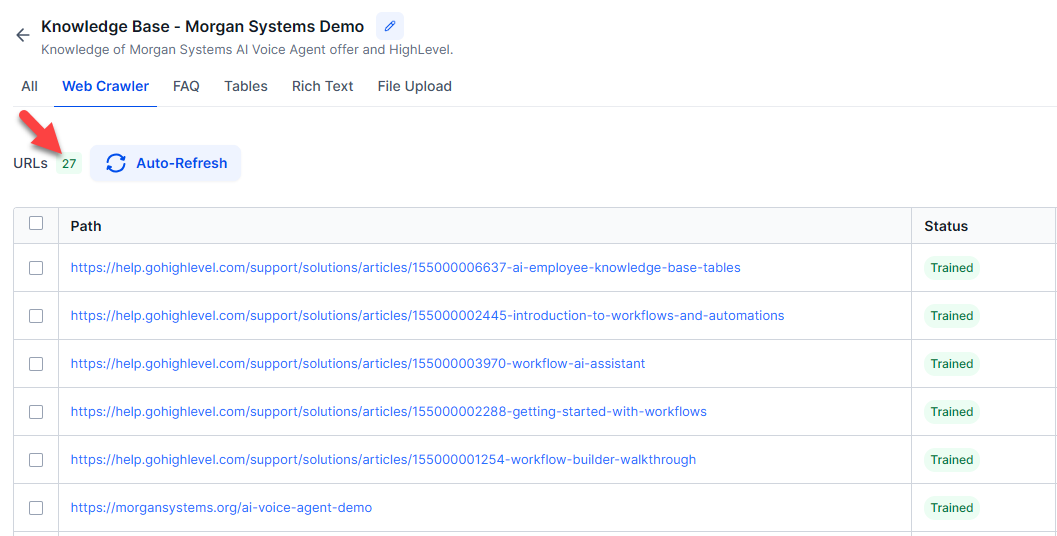
Our own knowledge base was created using the web crawler option to pull in knowledge from 27 URLs. You can view it here:
 🔍 Click to expand
 🔍 Click to expand
With your knowledge base attached, configure what the agent should do — not just what it knows. The Agent Goals section defines the agent's behavior during conversations:
- Knowledge Base: Select the knowledge base you just created from the dropdown.
- Appointment Booking: Enable the agent to book appointments directly into your calendar. Select the calendar you want the agent to book into (you'll need at least one calendar configured in Calendars with a user assigned to it).
- Contact Field Collection: Define which fields the agent should collect during conversation — name, email, phone number, service interest, etc. These are saved automatically to the caller's CRM contact record.
- Call Transfer Rules: Set conditions under which the agent should transfer a caller to a live team member (requires a phone number — covered in Step 10).
Once you've configured the goals, click Save at the top right. Your agent is now fully configured and ready to be deployed.
Start with just your knowledge base and appointment booking enabled. You can always come back to add contact field collection, call transfer rules, and workflow triggers once you've verified the basics are working.
Your AI Voice Agent is built! Next, we'll create the chat widget, connect your agent to it, and deploy it on your funnel so visitors can start talking to it immediately.
Now let's create the widget that puts your agent on your website. Navigate to Sites > Chat Widget. If this is a fresh sub-account, you'll see a "Create your first chat widget" prompt.
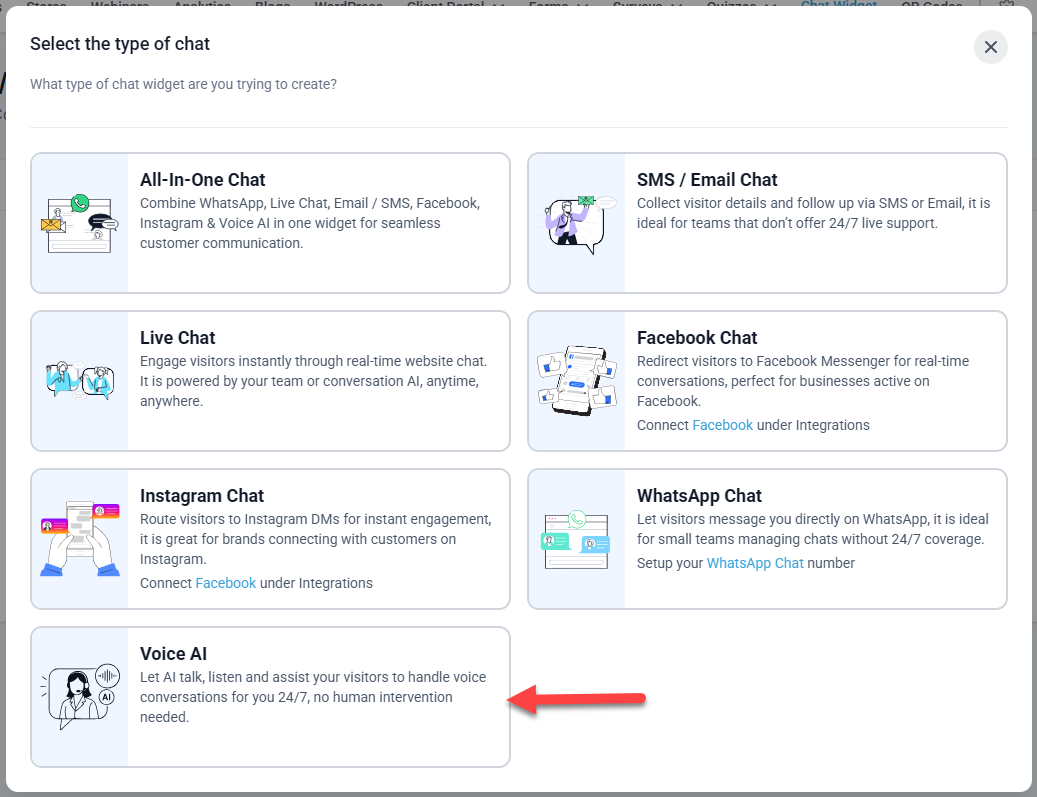
- Click + New to create a new chat widget.
- From the widget type options, select Voice AI.
 🔍 Click to expand
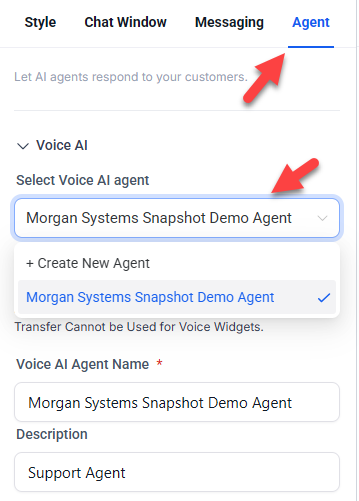
- You'll be taken into the widget builder with four tabs: Style, Chat Window, Messaging, and Agent.
- Go to the Agent tab and select the agent you just created from the dropdown.
 🔍 Click to expand
- In the Voice AI Agent Name field, enter the name you want displayed to your visitors (for example: "Sales Assistant").
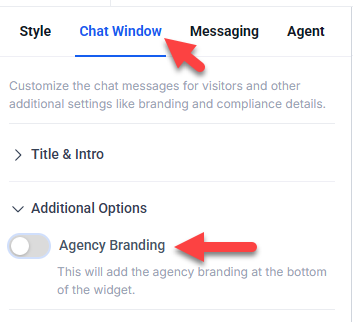
- Go to Chat Window to set your Title and toggle off Agency Branding for now.
 🔍 Click to expand
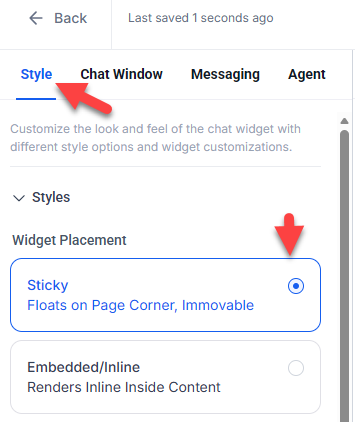
- Go to Style and choose Sticky.
 🔍 Click to expand
- Save your changes by clicking Save at top right.
Now let's get the chat widget embedded on some web pages. The example below embeds it into a sales funnel in the HighLevel Funnels section, but the embed code works on any website (if you have a HighLevel account).
- In the Chat Widget builder, click Get Code at top right beside the Save button.
- Copy the generated
<script>tag.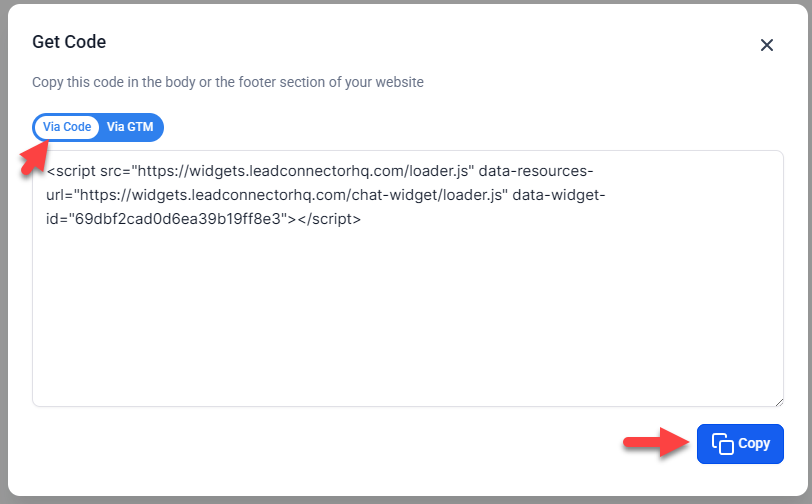 🔍 Click to expand
- Open any funnel you have already created or create a new one (Sites > Funnels). Navigate to the funnel's Settings.
- Find the Head Tracking Code section and paste the script tag into it.
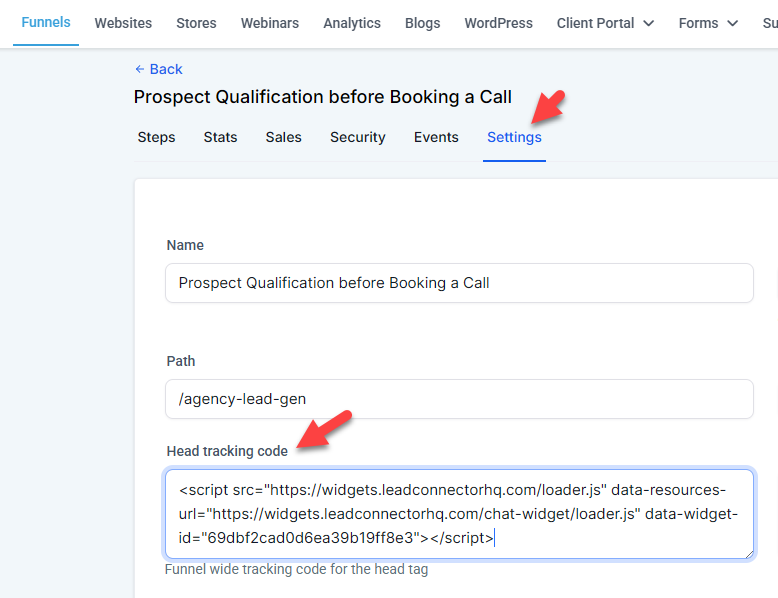 🔍 Click to expand
- Save your changes — the widget will now appear on every page of that funnel.
You can repeat this process for any other funnel or website where you want the agent to appear, like on your existing business website.
Time for the fun part. Open your funnel in a new browser tab.
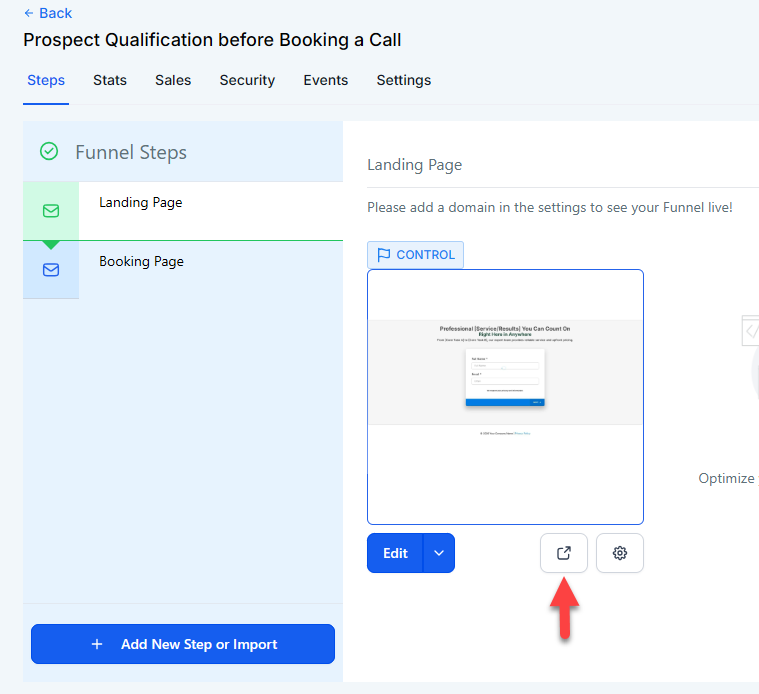 🔍 Click to expand
- Look for the chat widget icon in the bottom right corner of the page.
- Click it and grant your browser microphone permission when prompted.
- Try asking it a question from your knowledge base to verify it's responding with your content.
Your AI Voice Agent is live on your funnel! You can talk to it 24/7 and hear exactly how it handles your business questions. Next, we'll run some thorough tests before routing real traffic to it.
Before routing real traffic, run the agent through several conversation scenarios to make sure it handles everything well.
- Ask questions from your knowledge base: Verify it answers accurately with your content.
- Try curveball questions: Test what happens when visitors ask questions outside your knowledge base — it should gracefully offer to have someone follow up.
- Test the booking flow: Walk through a scenario where you'd want to book an appointment to confirm it flows through to your calendar.
- Check contact creation: After a test conversation, verify that a new contact was created in your CRM with the information the agent collected.
Run through at least 3–5 different conversation scenarios before routing real traffic to the agent. Small tweaks to your Agent Goals can make a big difference in how naturally it handles edge cases.
Worried about running out of trial time? HighLevel tends to be flexible with users who are actively setting up. If you're close to the end of your trial and still need more time to evaluate, reach out to a Specialist via the blue question mark (?) at the top right of your HighLevel dashboard — they can often work with you.
If you want your AI Voice Agent to handle incoming phone calls in addition to website chat, you'll need to assign it a phone number. For example, you may want to route unanswered calls to your AI voice agent rather than to a standard answering machine or expensive call center answering service. If you only need the website chat widget, you can skip this step.
Navigate to the Phone & Availability tab within your agent's settings:
- Assign a Phone Number: Choose one or more LC Phone or Twilio numbers from your sub-account. When these numbers are called, the AI Agent will answer.
- Set Business Hours: Define the days and times the agent should handle calls.
- Fallback Rules: Configure what happens after hours — route to voicemail, an alternate number, or a workflow.
The phone number you assign cannot already be configured for other specialized functions like IVR. If you need a dedicated number for the AI Agent, add a new one in Settings > Phone System first.
If you assigned a phone number in Step 10, test the phone experience before going live:
- Quick Test: In the Phone & Availability step, use the Test Your Agent panel on the right side. Choose your call type, enter your phone number, and click Call Me to receive a test call.
- Live Test: Call the assigned number from your own phone. Ask it questions from your knowledge base, try some curveball questions, and test the booking flow.
- Edge Cases: Test what happens when callers ask questions outside your knowledge base, when they refuse to answer qualification questions, and when they call outside business hours.
🔍 Click to expand
The real power of the AI Voice Agent comes when it feeds directly into your acquisition engine. During and after calls or chats, the agent can:
- Update Contact Fields: Automatically save collected information (name, email, service interest) to the caller's contact record in your CRM.
- Trigger Workflows: Initiate your pre-built follow-up workflows based on conversation content — for example, sending a confirmation email after booking.
- Transfer Calls: Route high-intent callers or escalations to a live team member under conditions you define (requires a phone number).
- Book Appointments: Schedule directly into the calendar you connected in Step 5.
If you've built workflows for booking confirmations and reminders, those same workflows will automatically fire once your AI Agent starts booking appointments — sending confirmation emails and SMS reminders to your prospects without any extra configuration.
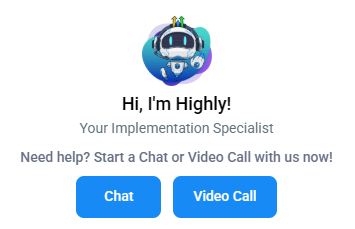
Configuring call routing, appointment booking, and workflow triggers inside the AI Agent's settings involves a few more technical steps that are best done with an expert on the line. Click the blue question mark (?) at the top right of your dashboard and select Chat or Video Call for real-time assistance from a HighLevel Specialist. They can screen-share with you to wire up the specific actions you need — routing rules, calendar booking logic, transfer conditions, and CRM field updates. (You get 90 free days of premium live video screen-share support.)
Your AI Voice Agent Is Just the Front Door — Here's What's Behind It
Your AI Voice Agent doesn't work in isolation — it feeds into a complete business platform that handles everything from the first conversation to the closed deal. Here's what it connects to:
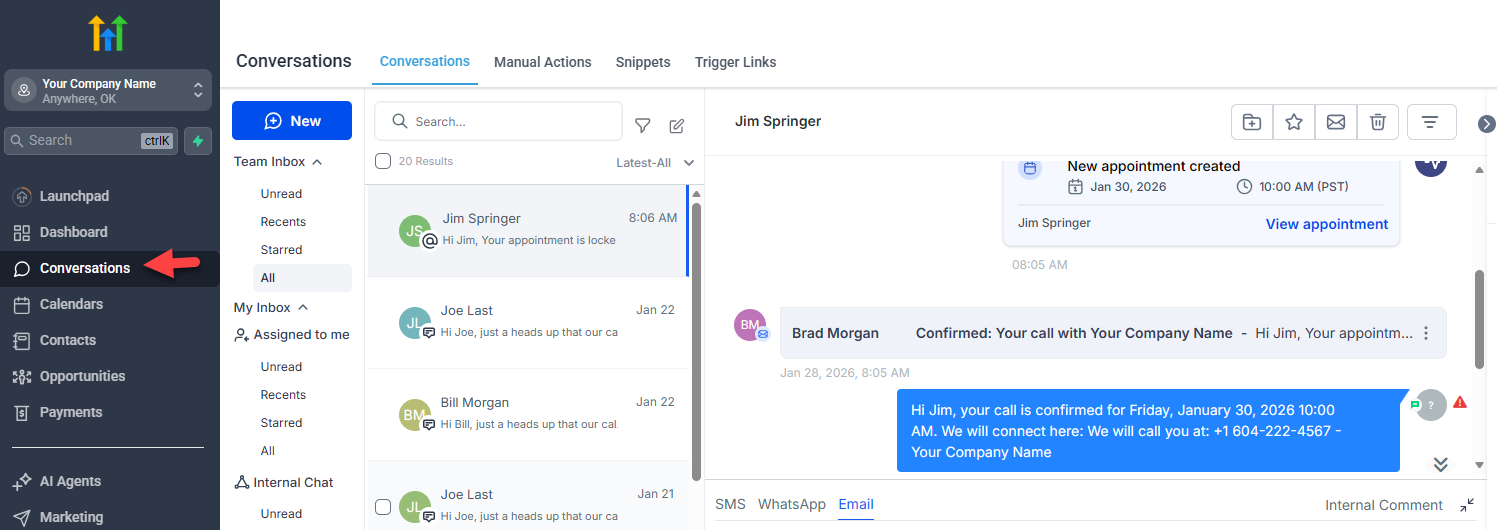
Conversations — Pick Up Where the AI Left Off
Every chat and call your AI Voice Agent handles flows into one unified inbox. When a conversation needs a human touch, you pick it up seamlessly — SMS, email, social DMs, and voice all in a single thread. No app-switching, no lost context.
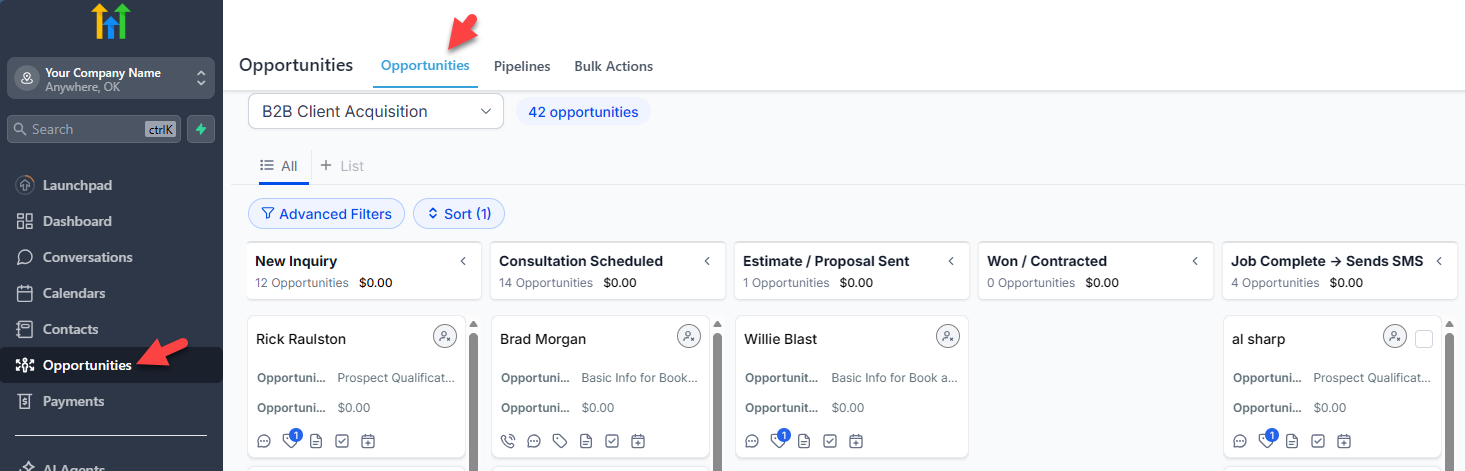
CRM Contacts & Opportunities Pipeline
When the AI Voice Agent books a call or captures a lead, that contact and their opportunity land in your visual sales pipeline automatically. Track every prospect from first inquiry to closed deal with drag-and-drop simplicity.
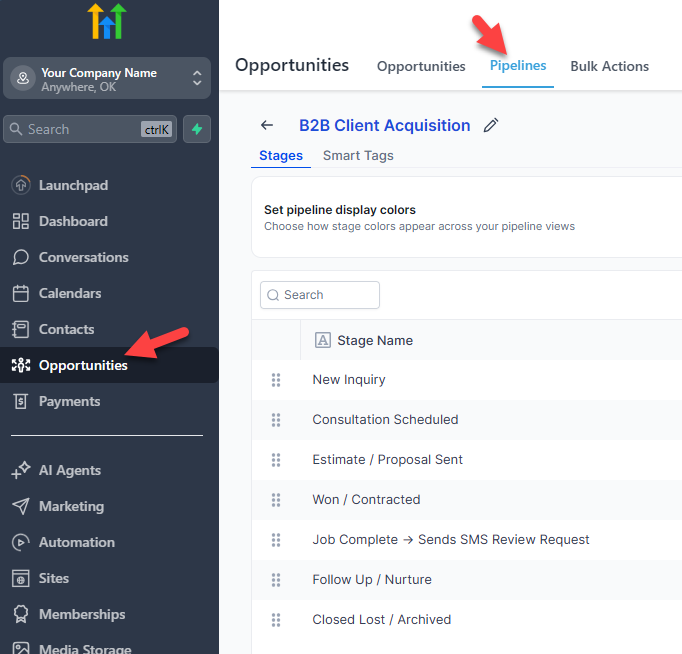
Fully Configurable Pipeline Stages
Your business isn't a template — your pipeline shouldn't be either. Add, rename, reorder, or remove stages to match your exact sales process. Whether you run a 3-step close or a 10-stage enterprise deal flow, the pipeline adapts to you.
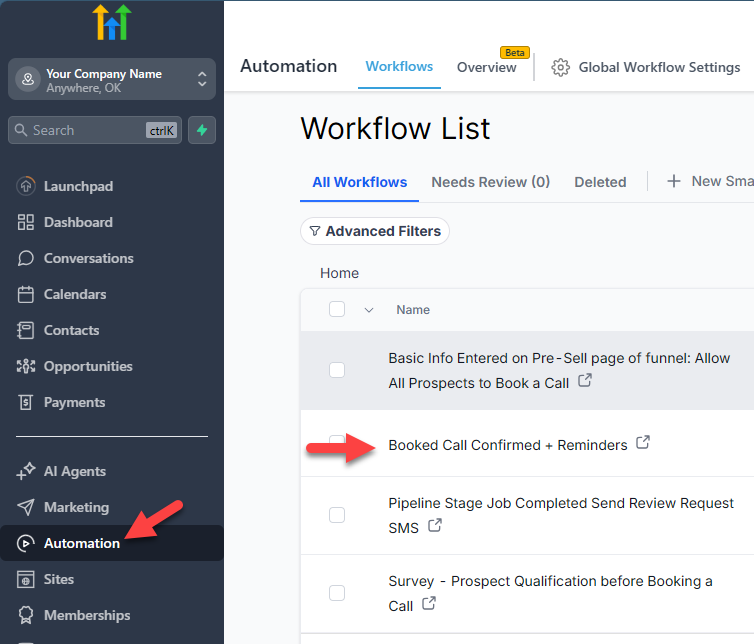
Automated Workflows — Confirmation Emails & SMS on Autopilot
When someone books through your AI Voice Agent, a HighLevel funnel page, or your website — automated workflows fire instantly. Confirmation emails, SMS reminders 24 hours and 1 hour before the appointment, and follow-up sequences all run without you lifting a finger.

Calendar Connections — Zoom, Google Meet & More
HighLevel's built-in calendar syncs with Zoom, Google Meet, Microsoft Teams, and external tools like Calendly. When a call is booked — whether by the AI agent or a prospect on your funnel — a unique meeting link is generated and sent automatically. No manual scheduling.
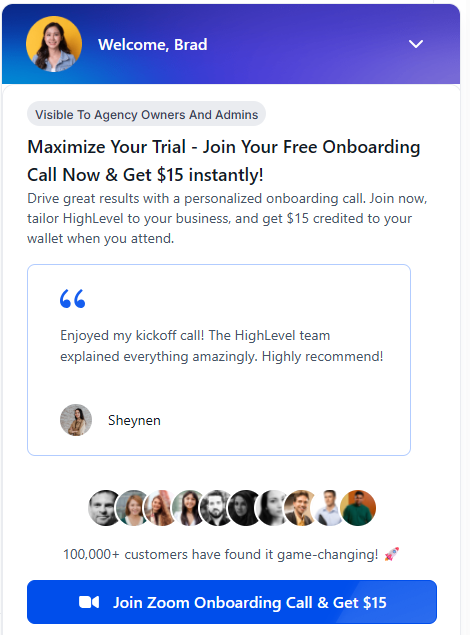
Free Onboarding Zoom Call — Live Screen-Share Setup
Right after signup, you can join a free 1-on-1 Zoom call with a HighLevel specialist. They log into your account via screen-share and walk you through the full setup — dashboard orientation, AI Voice Agent configuration, workflows, and everything in between.
90 Days of Premium Live Support
Stuck at any point after onboarding? Click the blue question mark at the top right of your dashboard and choose Chat or Video Call. A real human — not a chatbot — jumps on screen-share with you to resolve whatever you're working through. Available for your first 90 days.
Frequently Asked Questions
<script> tag into your website's header code — it works on any website platform including WordPress, Squarespace, Wix, Shopify, or a custom-built site. You're not limited to HighLevel-hosted pages. The same widget code can be added to as many sites and pages as you need.