
How Jobber Online Booking Works, and How the AI Receptionist Books Through It
One set of booking rules, two front doors: your online booking page and the AI Receptionist. Here is where every rule lives in Jobber, and how to set them up so both can book jobs for you.
Free trial, no credit card, then 20% off your first 6 months. That deal runs through our dedicated Jobber ambassador link, so start from this page to lock it in.
What's Inside
- 1 How online booking and the AI Receptionist fit together
- 2 The five booking rules and where they live
- 3 Rule 1: business hours
- 4 Rule 2: team member availability
- 5 Rule 3: bookable services
- 6 Rule 4: building the booking form, step by step
- 7 The other front door: your online booking page
- 8 Setup mistakes that stop bookings
- ? Frequently asked questions
How does Jobber online booking work with the AI Receptionist?
Online booking is the engine, and the AI Receptionist is one of two ways into it. In Jobber, online booking is a booking form plus a handful of rules: your business hours, which team members can be booked and when, which services can be booked and how long they take, and how visits are spaced out. Customers can use that form themselves, on your website, through your Client Hub, from a shared link, or from the Book Online button on your Google Business Profile. The AI Receptionist uses the very same form when a customer calls, texts, or chats, and Jobber's documentation says it uses your online booking settings to decide which team members to schedule and which services can be booked.
That shared setup is the whole point. You set the rules once and both front doors follow them. A customer booking on your website at 11pm and a customer talking to the Receptionist at 11pm see the same open slots, for the same services, assigned the same way. It also explains the most common surprise owners hit: without online booking, the Receptionist cannot book anything. It falls back to creating a request or taking a message.
If you have never set up online booking, the AI receptionist is a good reason to finally do it, because the work pays off twice: you get a phone and text agent that can book, and a 24/7 booking page for customers who would rather click than call. For what a booked call actually looks like on your schedule, see our page on whether the Jobber AI Receptionist books into your calendar. For the full feature picture, start with the Jobber AI Receptionist review.
The screenshots are from my own Jobber free-trial account, where I set up the settings and booking form shown. The trial does not let the Receptionist answer a live phone number, so I have not watched it book a real customer call. How the rules behave comes from the Jobber Help Center (the Online Booking, Requests and Bookings Settings, Manage Team, and Receptionist articles, updated between July and September 2026), checked October 2026. Online booking is available on select Jobber plans; cost is kept off this page, so see the AI voice agent pricing hub for numbers.
What are the five booking rules, and where do they live in Jobber?
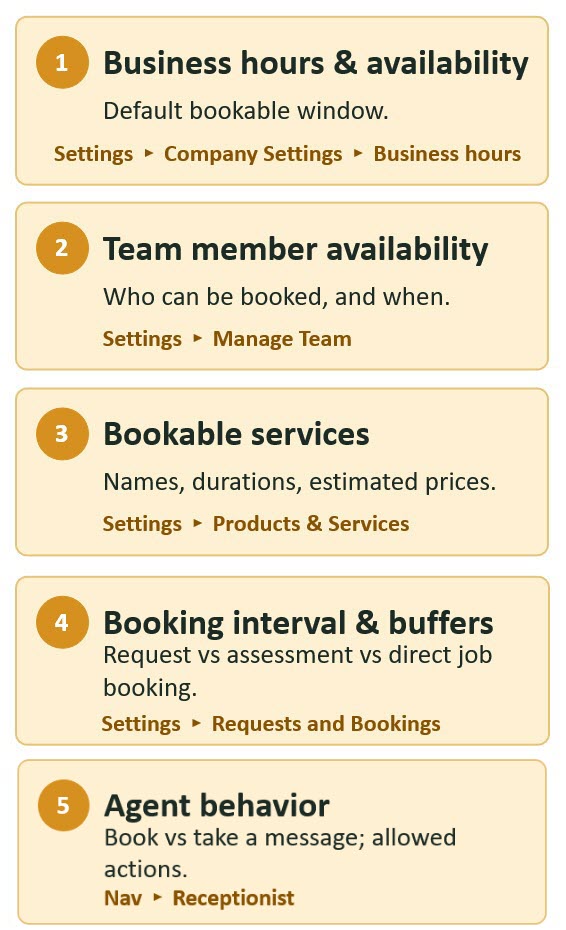
Five settings decide what the Receptionist and your booking page are allowed to book. They are spread across different parts of Jobber, which is why online booking feels confusing the first time:
- Business hours and earliest availability: the default window when anything can be booked, set in your company settings, with how soon a customer can book set on each form.
- Team member availability: who can be booked, and on which days and hours, set in Manage Team.
- Bookable services: which services can be booked, with their duration and estimated price, added to the booking form from your Products and Services list.
- Booking form, interval, and spacing: request, job booking, or assessment booking, plus time-slot interval, drive time, and buffers, all in Requests and Bookings.
- Receptionist behavior: whether the Receptionist books or only takes messages, and which form it uses, set in the Receptionist's own settings.
 Click to expand
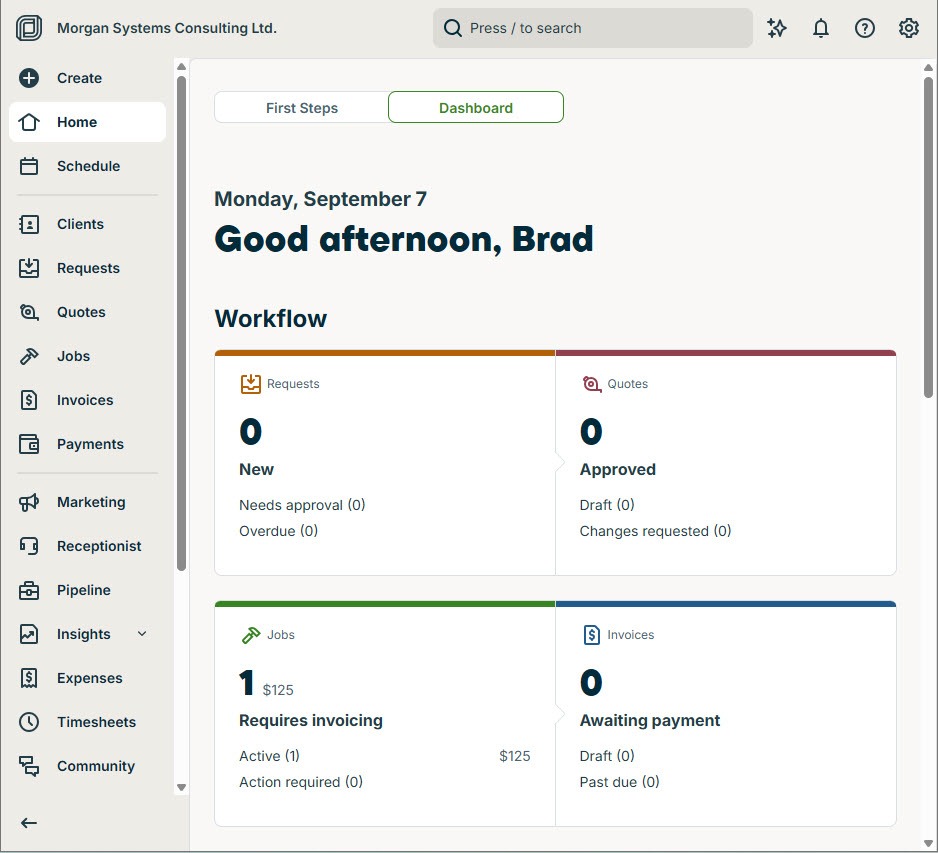
Everything starts from the Jobber home screen:
 Click to expand
The home dashboard shows the day-to-day numbers, such as jobs waiting to be invoiced. Two things on this screen matter here. The Receptionist link in the left navigation is where rule 5 lives: turning on scheduling, and choosing which booking form and request form the Receptionist uses. That part is covered screen by screen in the setup walkthrough in our Jobber AI Receptionist review. The gear icon at top right opens Settings, where rules 1 to 4 live, and that is where the rest of this page goes.
How do business hours control when the AI Receptionist can book?
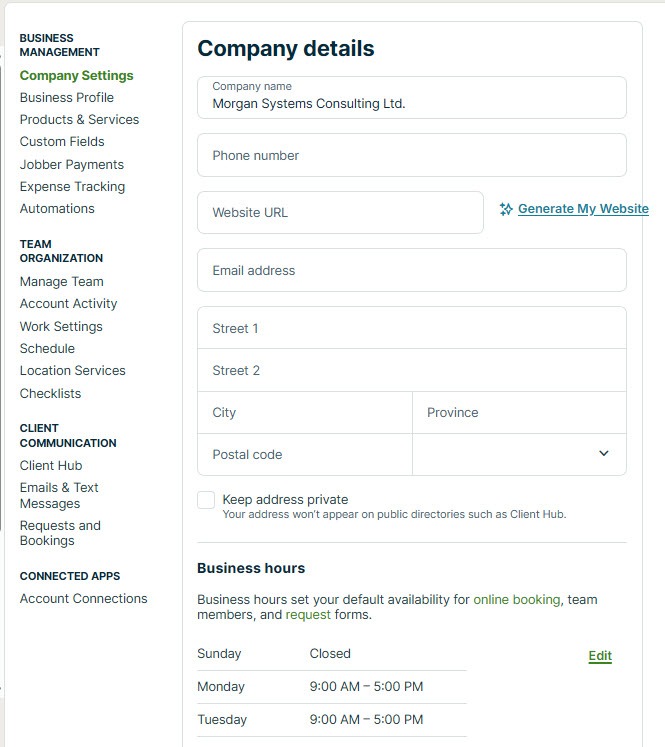
Click the gear icon and Jobber opens Settings, with every settings category listed down the left side. The first item, Company Details, holds your business hours:
 Click to expand
These hours do more than show up on your invoices. They are the default availability for online booking: bookable time slots start at the beginning of your business hours, days you are closed are greyed out for customers, and each team member's bookable hours are filled in from these hours to begin with. If your hours say you close at 4pm, neither your booking page nor the Receptionist will offer a 5pm visit.
Keep in mind that answering hours and booking hours are different things. The Receptionist answers around the clock, but it only books into the slots your hours allow. So a customer who calls at 10pm on Sunday can be booked into 9am Tuesday, which is usually exactly what you want.
The second half of rule 1, earliest availability, is set per form rather than here. It controls how soon after booking a visit can happen; setting it to one business day, for example, stops same-day bookings. It sits in the form's Settings tab, covered in section 6.
How does team member availability decide who gets booked?
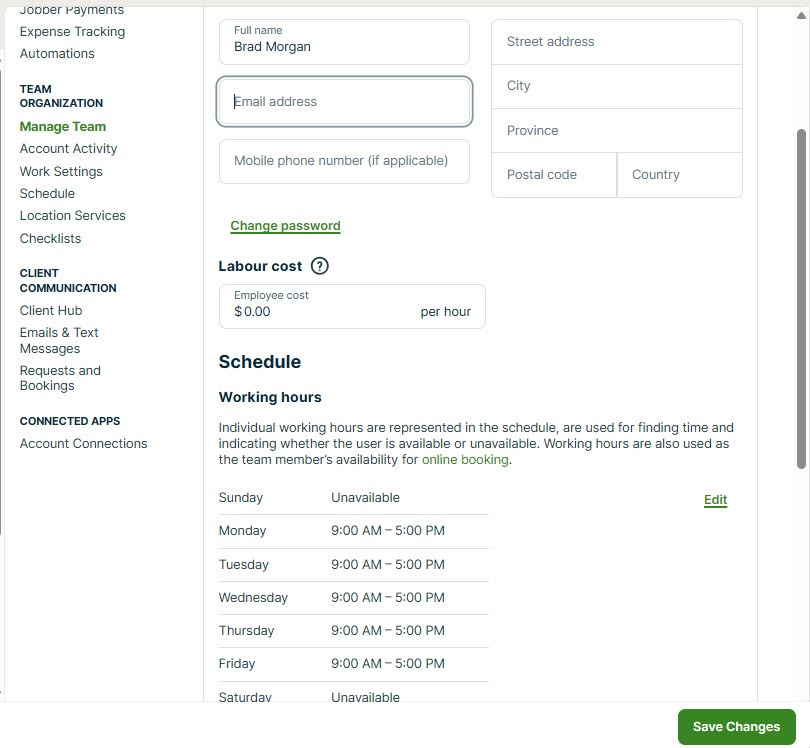
Next in the settings menu is Manage Team, where you add everyone who works in the business, along with details such as each person's labor cost and working hours:
 Click to expand
Online booking assigns visits to team members automatically, based on each person's availability for online booking. Open a team member, find that section, and click Edit to set which days they can be booked and their start and end times on each day. This is how you give a part-timer Tuesdays and Thursdays only, or keep an apprentice off solo bookings. When more than one person is free for a slot, Jobber assigns the visit at random among them.
Booking forms add one more layer: for each bookable service, you choose which team members can be booked for it. Your senior tech can be the only one offered for a panel upgrade, while anyone can take a routine service call. If someone is going to be away, block the time with a task on the schedule rather than a calendar event, because events do not stop online bookings (our calendar booking page explains why that catches people out).
Notice Requests and Bookings further down the same left menu. That is where the booking form gets built. First, though, the form needs something to book, which means services.
How do you set up the services the AI Receptionist can book?
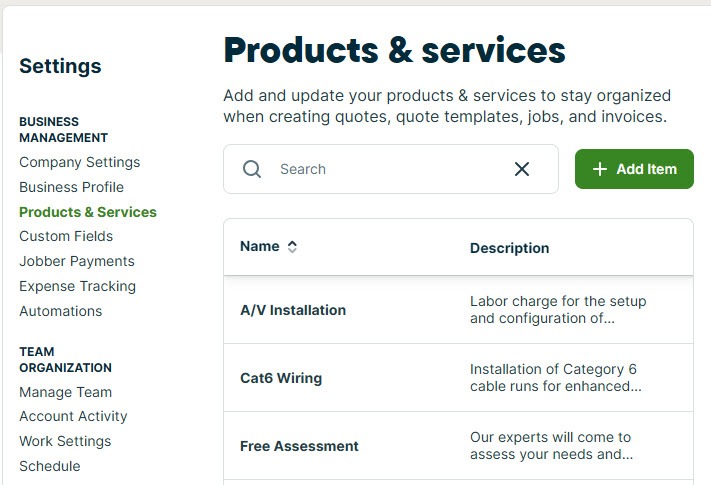
Bookable services start life in your Products & Services list, also in the settings menu. Every service a customer or the Receptionist can book is an item here first. The booking form then picks which of these items are bookable.
 Click to expand
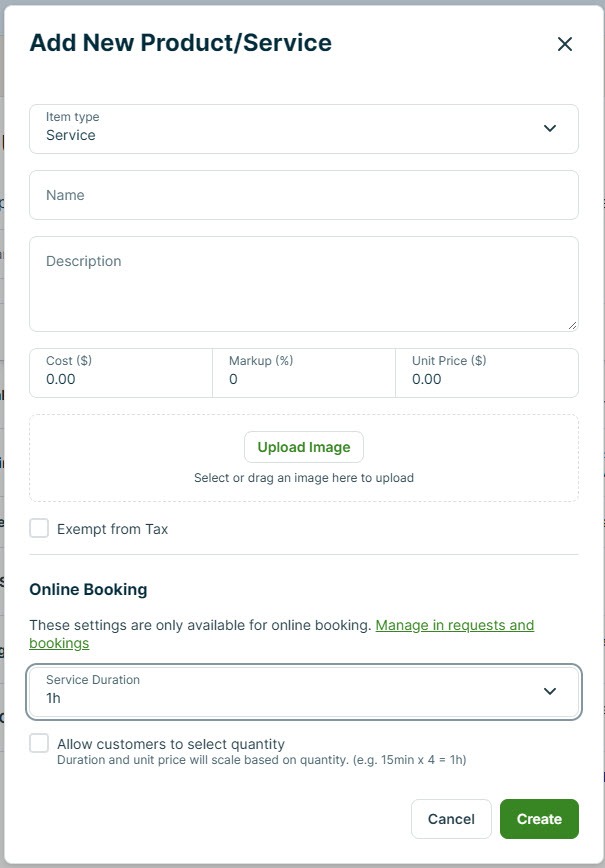
The list shows everything you sell, with a search box to find an existing service. If the service you want to offer for booking is already here, you are set; you will just add it to the form later. If not, click the green + Add Item button to create it:
 Click to expand
Each field has a job, and a few of them matter specifically for booking:
- Name and description: customers see both on your online booking page, so write them the way you would explain the job on the phone, including what is and is not included.
- Cost, markup, and unit price: cost and markup help you track your margin, and unit price is what you charge. Customers see an estimated price for each service when they book online, so make it a number you are happy to show up front.
- Image: useful on quotes and invoices, but Jobber notes that product and service images do not appear to customers during online booking.
- Tax: whether the item is taxable, so bookings carry the right tax into quotes and invoices.
- Duration for online booking: how long the visit takes, from 15 minutes up to 12 hours. This is the number the engine uses to block time on your calendar.
- Allow customers to select quantity: unchecked by default. Tick it for work sold by the unit, such as rooms, windows, or units serviced, and set a minimum and maximum; the duration and price then scale with the quantity the customer picks.
Duration is the setting that matters most. The engine fills your calendar using exactly the time you give each service, so if a job really takes three hours and you list it as one, the next booking lands on top of it. Time a few real jobs before you trust the number.
How do you build the online booking form the AI Receptionist uses?
The booking form is where bookable services, time slots, and visit spacing come together. It is the single thing both front doors book through, so it is worth building carefully. Here is the build, step by step.
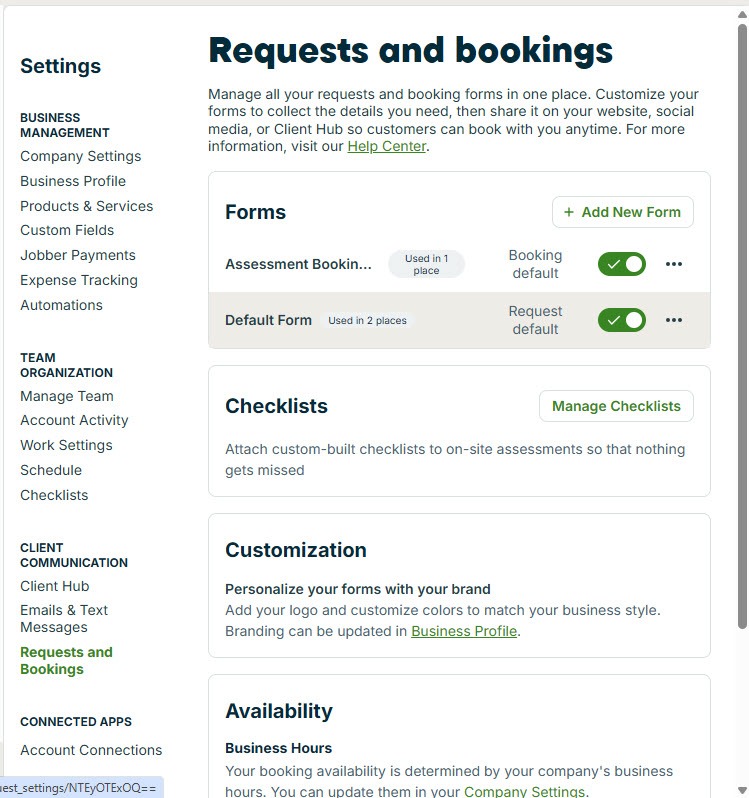
From Settings, select Requests and Bookings in the left menu. The Forms section lists every intake form in your account. Click Add New Form to start a new one.
 Click to expand
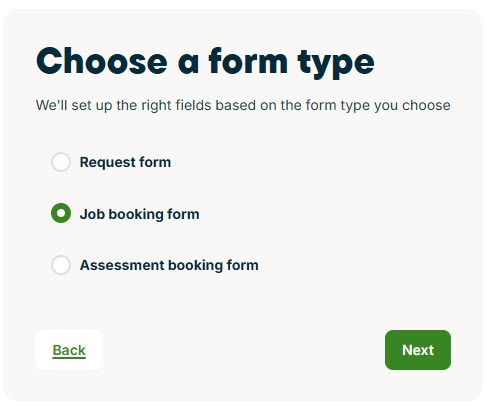
Jobber asks what kind of form this is. The choice decides whether anything can be booked at all, for your online booking page and for the AI Receptionist on a call.
 Click to expand
- Request form: gathers details for you to review. Nothing is booked.
- Job booking form: the customer picks a service and an open time, and Jobber schedules a one-off job.
- Assessment booking form: books an on-site visit so you can see and price the work, and creates a request alongside it.
A form holds one booking type, so a business that sells fixed-price services and also does site visits for bigger work needs two forms. You can also start with a plain request form and add a job booking or assessment booking action to it later.
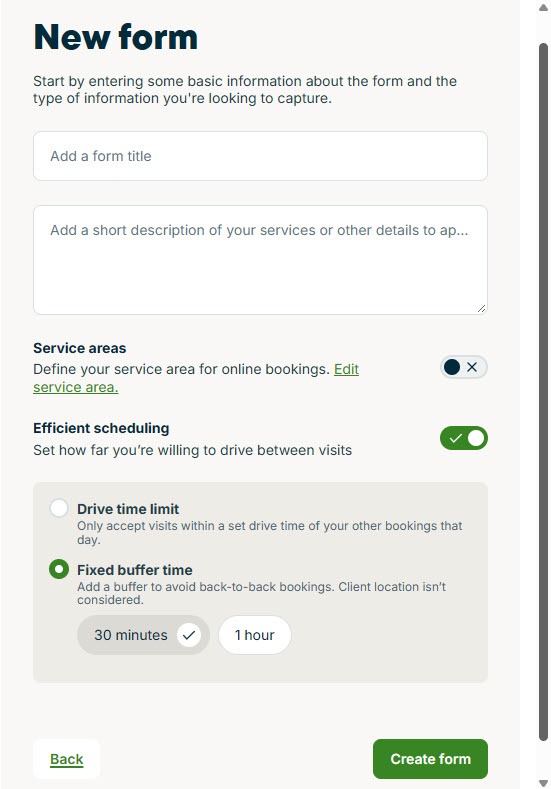
On the new form screen you give the form a name and a short description that appears above it, then decide where you will travel and how visits are spaced.
 Click to expand
- Service area: limits bookings to the area you serve. On the booking page, customers enter their location first, and anyone outside the area is told online booking is not available and to contact you instead.
- Drive time limit: only offers slots within a set driving time of the other visits booked that day, using the customer's address. Jobber calculates this with a third-party service, TravelTime, available in countries including the United States, Canada, the United Kingdom, and Australia.
- Fixed buffer time: adds a set gap, such as 30 minutes or an hour, between every appointment, so you are never booked back to back.
- No time restrictions: allows back-to-back bookings with no travel or buffer limit.
Assessment booking forms add one more switch here, Require assessment booking approval, which holds new bookings as Needs Approval requests until you accept them. All of these can be changed later from the form's Settings tab.
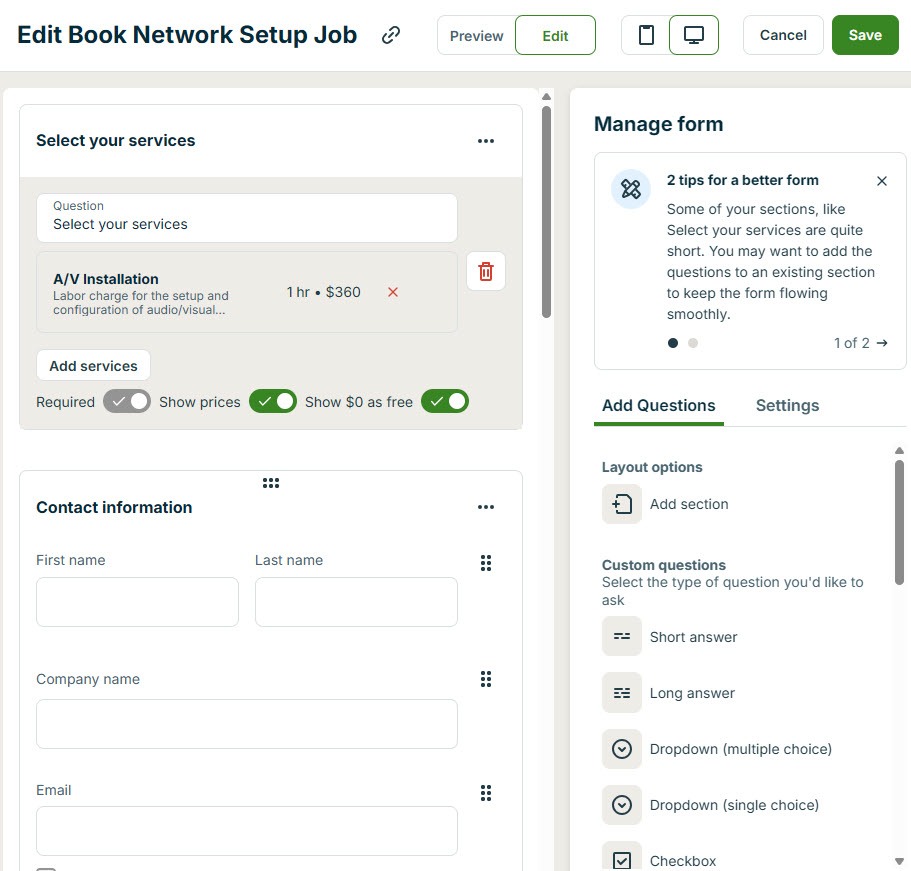
Now you add the services people can book, such as A/V Installation in this example, along with the contact details you need from them.
 Click to expand
Pick services from the Products & Services list you set up in section 5, or create one on the spot. For each one you can double-check the price and duration and choose which team members can be booked for it. Jobber displays up to 100 services in online booking, but a short, clear list is easier for customers and for anyone choosing over the phone.
For contact details, every form needs a first and last name (or company name) and at least one way to reach the customer, email or phone. A consent checkbox for emails and texts is included automatically. When a new person submits a form, Jobber adds them to your client list, labelled as a lead until they become a client.
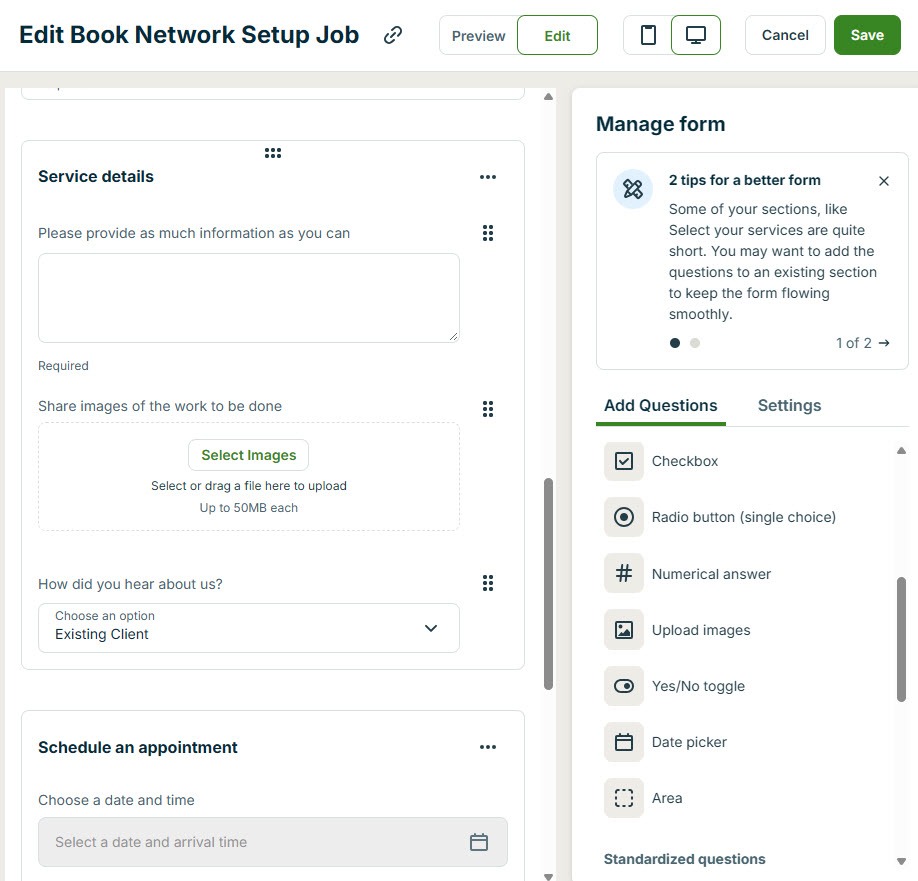
The rest of the form collects what you need to show up prepared, and lets the customer pick their time.
 Click to expand
- Service details: a multi-line text box where the customer describes the job in their own words, so you know what you are walking into.
- Image upload: lets customers attach photos of the problem, which are added to the booking as an internal note.
- How did you hear about us? a dropdown whose answer fills in the lead source on the client's profile, so you can see which marketing actually brings in bookings.
- The booking calendar: where the customer chooses a date and time from your open slots.
The panel on the right holds every other question type you can drag in: checkboxes, radio buttons, dropdowns, yes or no toggles, short and long answers, numbers, dates, and an area field for length by width. Any question can be marked as required.
One optional extra: the Add payment method field asks customers to save a card when they book through Client Hub. It needs Jobber Payments, takes cards only, and is not supported on forms embedded in your website.
Jobber's documentation does not spell out whether the Receptionist asks every custom question on your form during a phone call. Before you rely on a question for pricing or prep, use the Receptionist's test call to hear what it actually collects.
The form's Settings tab holds the timing rules. Booking interval sets the steps between offered times; a 30-minute interval offers a slot every half hour from the start of your business hours, while a longer interval offers fewer, wider-spaced options. Earliest availability sets how soon a visit can be booked, for example one business day out to stop same-day bookings. The same tab holds the share link and embed code for your website, the Google Business Profile connection, and Google Analytics tracking. Save the form when you are done.
The last step happens back in the Receptionist settings: switch on scheduling jobs, then choose this form as the booking form it uses (and your request form for everything else). Until you do, the Receptionist cannot book through the form you just built, no matter how well it is set up.
Where do customers find your Jobber online booking page?
The same form that the Receptionist books through can be put in front of customers in several places, and you can use as many as you like:
- A share link you can text, email, or post on social media.
- Your website, using the form's embed code, or Jobber's plugins for WordPress and Wix.
- Client Hub, your customers' self-serve portal, which uses your default form.
- Your Google Business Profile, where a Book Online button can link straight to a form. Jobber connects your default form automatically when your Jobber address matches your Google listing, and each form has its own Google Business Profile setting.
On the booking page itself, a customer checks they are inside your service area, picks services from your list (seeing the description, estimated price, and duration), enters their contact details and property address, adds notes or photos, and chooses a date and time from the days and slots your rules leave open. After they confirm, they see a confirmation screen and get an email with a link to the appointment in Client Hub. On your side, the visit is already on the schedule and admin users get a notification.
This is the carpet-cleaner path: a customer who would rather pick a date and describe the stain than wait for a callback. The AI Receptionist covers everyone who still picks up the phone or sends a text. Two doors, one set of rules, and no double entry for you.
What setup mistakes stop the AI Receptionist from booking jobs?
When owners say the Receptionist "won't book," the cause is almost always one of these settings, not the AI:
- Only a request form exists. Request forms never book. You need a job booking or assessment booking form.
- The Receptionist is not pointed at the form. Building the form is not enough; scheduling has to be switched on and the form selected in the Receptionist settings.
- Business hours or team availability are too narrow. If nobody is bookable on a given day, there are no slots to offer. Check both company hours and each person's availability for online booking.
- No bookable services, or the wrong team members on them. A service with no eligible team member has nobody to book.
- Unrealistic durations and no buffer. The engine trusts your numbers. Short durations with no buffer or drive time limit lead to overlapping visits and crews zigzagging across town.
- Earliest availability set too far out. A setting meant to stop same-day jobs can quietly push every offer days into the future.
- Mixing services and site visits on one form. A form carries one booking type. Split them into a job booking form and an assessment booking form.
Open your form's share link and book a test appointment yourself, as a customer would. Then use the Receptionist's test call to hear how it handles the same request. If the slots, services, and team member look right on the schedule after both, your rules are working.
The bottom line: the Jobber AI Receptionist books through your online booking form and nothing else, so the quality of its bookings comes down to five settings: business hours, team availability, bookable services, the booking form and its spacing, and the Receptionist's own actions. Set them once and both your phone and your website book jobs by the same rules.
If you are not on Jobber yet, you can build all of this, including the booking forms and the Receptionist itself, on a Jobber free trial; putting the Receptionist on a live phone number is the step that needs a paid plan. For cost, see the AI voice agent pricing hub, and for everything else the Receptionist does, head back to the Jobber AI Receptionist review.